Find or Sell Used Cars, Trucks, and SUVs in USA

1995 Mazda Miata With 350z Motor Swap - Unfinished Project on 2040-cars

US $6,000.00
Year:1995 Mileage:30000
Location:

Spring Branch, Texas, United States

Spring Branch, Texas, United States

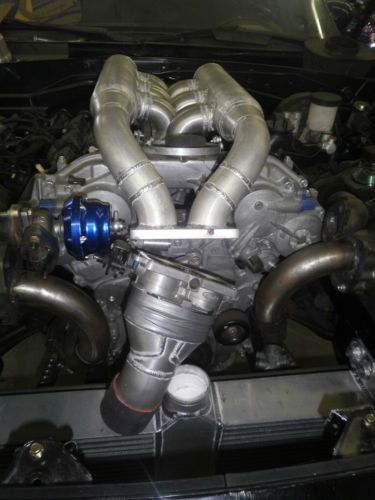
This is an unfinished project. The car does not run and needs someone to finish this project. It is a 1995 Mazda Miata with a Nissan 350z motor, TEC3 engine management, full rollcage, TEIN shocks with EDFC, Nissan LSD, Kodiak Racing 3 piece lightweight 17" wheels (front and rear) and two 15" wheels with slicks, Wilwood brakes, body kit that is custom molded together so rear and front bumpers are molded into the side panels, and lot's of other custom aftermarket parts such as headlights, gauges, etc.

You will need to make arrangements to pick up or have the car shipped to you. You will be dealing with Bell Engineering.

The car is located at:
Bell Engineering
203 Kestrel Drive
Spring Branch, TX 78070
(830) 438-2890
corky@bellengineering.net

Google Bell Engineering and go to their website. Click "Current Projects" link under "In The Shop". Click on "1.8L Miata w/ 350Z Motor". I'm sorry but Ebay does not allow me to provide links.

For more pictures of the project please send me a message. Ebay does not allow me to provide links to my photo album.

These are the stuff Bell Engineering did.  

 1.       Motor and transmission. Labor Labor for 17 hours for work done thru Oct. 15, 2008. Uncrated and disassembled motor, drive train, modified engine bay for motor to fit, working on mounting transmission, steering rack and subframe.

 2.       Modification of subframe. Pulled existing motor out of engine bay and started prep work on the frame rails, removed all mechanical and electrical parts from the engine bay to prep for cleaning and paint.

 3.       Fabricating initial flat steel flanges for the exhaust manifolds. Tim cut and welded the pieces to cover the frame rails inside the engine bay. Cut the flat bar and tubes to build the rear differential brace which will mount the 350Z diff to the car. Used the factory mount positions and built an I beam to connect the two bushing holders. Finished the other side of the engine bay, tack welded the diff brace together.

 4.       Hanging the rear differential brace on the car using the factory top bushings. Upper bushings will have to be modified or replaced to allow bolt to stick through the new diff brace. 350 diff is in place under the new brace and measured for additional bracing. The entire rear suspension is going to be pulled off the car to fit the diff as we have to bolt through the rear crossmember and the gas tank is above it. Removed the entire rear suspension subframe assembly from the car. Removed the fuel filter system under the body of the car, a few miscellaneous parts from the underbody and tore down some of the subframe so the diff can be mounted.

 5.       Disassembling and repairing rear differential; fabricated and welded braces, and painted engine bay.

 6.       Fabricate jig for turblar K-Member; continued building race for rear differential.

 7.       Work performed on rear differential reinforcements and mount; changing the mounts on the K member jig to fit the lower pipe around the tabs. Performed welding on the intake manifold. Measurements were taken for cross beams of K-Member and frontal loop.

 8.       Work performed on threading the vertical rods to hold the diff in place & assembled the diff bracket. Installed the rear diff carrier back on the car. Installed the brake lines, fuel, electric in the rear of the car. Prepped the diff and researched LSD options for rear. Started building the front tubular K member starting with the forward mounting positions and A-Arm mounts.

 9.       Worked on crossmember and motor mounts, motor mount blocks. Aligned the transmission to differential

 10.   Working on the drive line splash guard.

 11.   Work performed on rear axle, motor mounts, transmission mounts and steering. Removed the interior and started design on the roll bar/cage.

 12.   Fabricating the steering and purchasing the materials for the roll bar/cage. Roll bar materials - steel round tubing.

 13.   Designing and fabricating roll bar. Stripped interior of car worked on bracing and obtaining materials.

 14.   Fabricated roll bar floor plates, researched and located cage braces.

 15.   Roll cage main hoop, front cage braces for front windshield.

 16.   Worked on locating turbo on car, and steering placement, and relocating some wiring.

 17.   Tack welded roll bar in place.

 18.   Worked on turbo placement, steering, and modifying the body to accommodate the radiator and intercooler.

 19.   Welded front support, removed support and mocked up intercooler and boost tubes. Finished crossbracing on roll cage.

 20.   Welded on roll bar, and worked on turbo exhaust manifolds.

 21.   Welded top cross bar in on roll cage, welded all seams on roll cage except for driver side due to clearance problems, welded intercooler cores together for intercooler, aligning and prepping rear-end to get ready to install.

 22.   2 left and 2 right Heim (Rod Ends)

 23.   Made differential mounting plate for the rear end; boxing upper control arms on rear end. Built the anti-roll bar for the rear suspension.

 24.   Worked on torque arms from lower control arms to the sub-frame; built brackets for hiem joints on torque arms; built torque arms and bracing.

 25.   Worked on anti-roll bar, straitening frame rails and fabricated frame rail boxes to strengthen the frame rails, installed the boxes from front to back. Welding frame rails together, putting brackets on to connect front k-member to frame rails, fitting new frame rails in the car and welding them in place solid.

 26.   Welding pinion angle supports in to place and rear end plate fully bolted in.

 27.   Re-installing front suspension, steering rack, tie rod ends and steering arms and alignment.

 28.   Pulled motor and cross member. Build path thru motor mounts for the steering shaft.

 29.   Make Brackets to strengthen the steering rack mounts. Build a tube thru the cross member for the steering shaft. Corky Welded on all brackets and tubes.

 30.   Grind Clearance on cross member and turn the steering shaft down on one end. Needed in order to clear the cross member.

 31.   Finish welding the cross bar at the front of the car (radiator area) to permit removal of shock absorber and cowl support.

 32.   Clean and Repaint tube and firewall. Clean front suspension and rack at the car wash. Degreased and brushed clean. Repainted.

 33.   Assemble and partially install front suspension.

 34.   Paint Steering Column. Clean and lube U joints.

 35.   Front Bumper installed to check fitment. Bumper uninstalled. Painted Engine mounts. Assembled engine mounts to Motor. Motor installed in chassis.

 36.   Exhaust Manifold Driver and Passenger Side. External Wastegate Design. Modify Engine Block for Manifold to clear engine.

 37.   Parts & Materials.18 Weld Elbows. 2.5' of 2.5" ID 3/16 wall thickness Steel Tubing. Two Turbine Inlet Flanges. Two Wastegate Flanges. Two Weld Elbow Reducers 2.0" to 1.5".

 38.   Remove Exhaust Manifolds. Alter WG tube, Additional Fabrication, and welding.

 39.   Install Rear Suspension.

 40.   Install Front Brake Assemblies. Discs, calipers, and pads.

 41.   Install sub frame connectors for torsion rails.

 42.   Tape Off Roll Cage and Car. Primer Roll Cage. Paint Roll Cage.

 43.   Fabricate and Install Plate to cover old shifter hole. Used OEM fasteners.

 44.   Aluminum Sheet -.080 - 3003 Alloy. 7" x 8" piece used.

 45.   Pulled Rack and Pinion and tack welded on arms. Reinstalled for test fitment.

 46.   Welding on Flange by CB. Weld in disc for Ext WG. Layout, design, mock up, and some fabrication of exhaust pipes. Exhaust pipes are not complete.

 47.   2 1/4" U bend - 4" Radius.

 48.   2 1/4 " U Bend - 3" Tight.

 49.   2 1/4" Mild Steel Tubing Aluminized, 16 gauge.

 50.   Downpipe Flange - Mild Steel.

 51.   Modify K Frame to fit Starter motor. And to fit Oil Filter. Welded and Repainted.

 52.   Pull Motor to modify K Frame and to Modify Oil Pan.

 53.   Design and Fabricate Oil Pan Flange & Pick up flange. Make Flange.

 54.   Additional Fabrication of Downpipe and turbo Wastegate vent tube.

 55.   2" x 1" Steel Flat Bar.

 56.   2 3/4" Steel Tubing Aluminized.

 57.   Aluminum Sheet - 3003 Alloy, .125 (1/8).

 58.   1 1/2" U- Bend 3" Radius, 16 Gauge.

 59.   Wastegate Flange 3/8 HR.

 60.   Primer Paint for Frame.

 61.   3" x 1/2" Aluminum 6061 Flat Bar and welded together to make oil pan flange mount.

 62.   Intercooler cores

 63.   Clean and paint oil pick up tube and pick up screen. Build cover plate for oil pan. Install upper oil pan bolt at the pick up tube.

 64.   Make Oil Pan Gasket. Re-surface the oil pan. Deburr oil pan and clean. Prep oil pan for hole repair.

 65.   Intercooler Design, cut/fit of metal, fabrication, mounts, and welding together.

 66.   Modify fender/frame for Intercooler fitment.

 67.   Design, route, and fabricate Intercooler inlet tube (from turbo to Intercooler) on driver side. Partial tube on passenger side. Need to be finish welded later.

 68.   Build base plate for intake. Prepare elbows for intake fabrication.

 69.   Grind and polish top of Cam Timing Cover for clearance. Pits will be re-welded and smoothed later.

 70.   10mm x 1.5 x 37mm Grade 8.8 ZP Studs.

 71.   10mm x 1.50 Hex Flange, All Metal Lock Nut.

 72.   Design and Fabricate of dual plenum/intake manifold. Design/Fabricate/Welding Intercooler to manifold plenum.

 73.   2.0" Elbow Casting.

 74.   3.5" OD Aluminum Tubing. 6063. 11 Gauge.

 75.   3.5" X 1/4" Aluminum Strap.

 76.   2.25" Alum. Elbow.

 77.   2.25" to 3.0" Cones. About 2" long.

 78.   Design/Fabricate/Weld Cones.

 79.   Design/Fabricate/Tach Weld base and air tubes to plenum.

 80.   Design/Fabricate/Weld Wastegate vent tubes to exhaust pipe. Passenger side and Driver Side Exhaust Pipes.

 81.   Wastegate Flange 3/8 HR.

 82.   1 1/4" U Bend

Auto Services in Texas

Z`s Auto & Muffler No 5 ★★★★★

Auto Repair & Service, Brake Repair
Address: 16548 Stuebner Airline Rd, Jersey-Village
Phone: (281) 370-4500

Wright Touch Mobile Oil & Lube ★★★★★

Auto Repair & Service
Address: 6011 Whitter Forest Dr, Jersey-Village
Phone: (832) 272-5376

Worwind Automotive Repair ★★★★★

Auto Repair & Service
Address: 101 Bowser St, Scurry
Phone: (972) 563-3700

V T Auto Repair ★★★★★

Auto Repair & Service, Automobile Parts & Supplies, Automobile Accessories
Address: 243 Blue Bell Rd Bldg A, Atascocita
Phone: (281) 999-6444

Tyler Ford ★★★★★

New Car Dealers, Automobile Body Repairing & Painting, Used Car Dealers
Address: 2626 S Southwest Loop 323, Winona
Phone: (866) 595-6470

Triple A Autosale ★★★★★

Used Car Dealers
Address: 155 Maplewood St, Lumberton
Phone: (409) 246-8030

Auto blog

Mazda rolls out unlimited mileage warranty in Canada

Fri, 14 Nov 2014

Cold weather might be starting to grip parts of Canada, but our neighbors to the north are going to be able to drive their 2015 Mazda cars and utilities from Vancouver to Montreal with a little more peace of mind. That's because Mazda Canada is instituting an unlimited mileage warranty for its new models.
The updated plan starts with all 2015 model year vehicles (even those already sold), and the scheme simply removes that distance limit on everything but the emissions defect coverage. That means that the Mazdas have one year of service adjustments, three years of new vehicle coverage, five years on the powertrain, seven years against corrosion and three years of roadside assistance for as many kilometers as the owner drives.
The change removes at least one, tiny piece of anxiety about buying a new vehicle because it's easy to know when the coverage ends. "By offering our customers an Unlimited Mileage Warranty, we believe it will enhance their ownership experience by alleviating concerns such as kilometre limitations, repair costs and resale value," Kory Koreeda, president of Mazda Canada, in the automaker's announcement.

2014 Mazda6: Winter's End Update

Mon, 14 Apr 2014

The Winter Without End is seemingly dead. Outside my office windows, my brown and yellow lawn is fully exposed to the increasingly powerful sunshine, the morning birdsong is louder than anything until the garbage trucks start rolling, and I'm seriously considering having the summer tires put back on my personal fleet. That last one is a little scary, as I'm a firm believer in the April Snow Jinx, but you get the idea.
The long-term Mazda6 has also long since left my driveway. Looking back on my notes from the time it was in my charge, however, I see all remarks are dominated by one highlighted section at the top: "worst winter drive of all time." I hardly need the reminder, to be honest. Here's what happened.
When the Mazda showed up at my door, we'd already fitted the thing with its new winter rubber: Bridgestone Blizzaks. Plunking down for dedicated snow tires was a near necessity this year - as it almost always is in Michigan. We didn't see much reprieve from snow-choked, iced over roads here in Ann Arbor, and the knobbier rubber proved invaluable in getting me out of my house time and again.

Why the 38-mpg 2014 Mazda6 is on dealer lots, but you can't drive it

Fri, 21 Dec 2012

If you stop by your local Mazda dealer this month, with any luck, you'll see the much-anticipated 2014 Mazda6 parked in the showroom - there are already a few hundred of them out there. That's quite an accomplishment in light of the fact that it isn't even calendar year 2013. The move is part of a strategic decision by the Japanese automaker, which is hoping to capitalize on holiday showroom traffic. (The last five days of the year are typically among the busiest dealer days all year).
If you happen to spy the rakish sedan, you may notice something missing - a window sticker. That's because Mazda (like other automakers) can't legally display the Monroney on a 2014 model year vehicle until January 1, 2013. According to Autoblog sources, Mazda dealers are legally prohibited from letting you test drive until the start of 2013, so it's more of a sneak preview than anything else. Even so, we reckon shoppers will be impressed when they finally get a look at those window stickers - Mazda hasn't announced fuel economy figures yet, but Autoblog has learned that the 2014 model will carry a pair of impressive numbers: EPA estimates of 27 miles per gallon in the city and 38 mpg on the highway using regular gas.
Mazda dealers are legally prohibited from letting you test drive until the start of 2013, so it's more of a sneak preview than anything else.